Login Guide
myzonemoves.com – Myzone Account Login Guide
Access to Myzone Account Online:
You’ve procured your feeling of having a place, so embrace another strategic advantage. Myzone makes everything fair of wellness, sport, and active work for a local area experience where everybody’s welcome to play. Prize your work and feel better, all around, each time you get in the zone.
Through certainty, rivalry, and local area, they’re more grounded together. The effort is diverse for us all. At the point when they work out, they ought to be compensated for what we put in. So they created Myzone Effort Points, custom-made to how hard your heart is functioning; not to your wellness level.
Features of MyZone Account Services:
- Arrive at various zones on-screen dependent on your pulse. Each zone merits an alternate number of MEPs. The harder you work, the more you procure. Moment input reveals to you when to dial down or venture up as you enter each zone. MEPs change normal exercises into a game with inspiration and commitment ensured.
- Disregard stowing away at the back, they’re more grounded together, sharing the experience.
- Freedoms to up your MEPs are all over. The Myzone application allows you to follow them live.
- Get continuous criticism during the activity and save your exercises. Complete pulse difficulties, wellness tests and offer your exercises with your associations.
- Meet World Health Organization rules for actual work each month.
- Acquire Myzone Effort Points for actual work each time you wear your Myzone gadget.
- In any event 150-300 minutes of moderate-force vigorous active work.
Myzone Account Login:
- To boost your stamina MyZone offers several plans.
- To get the plans you have to log in to the online account. Open the page myzonemoves.com
- As the page appears at the center you will get the login widget to provide email or username, password. You have to click on the ‘Log in’ button.

How to Reset Myzone Account Login Information:
- To reset the login information open the page myzonemoves.com
- Once the page appears in the login screen hit on ‘Forgotten password’ button.
- You have to enter account associated email and click on ‘Submit request’ button.
Register Your Myzone Belt:
- To register for the account open the website myzonemoves.com
- After the page appears in the login widget hit on ‘Register your belt’ button.
- In the next screen provide facility code, unique belt ID, email address, password now click on ‘Next’ button.
How to Shop at Myzone Account:
- To shop at Myzone open the page myzone.org
- As the page appears at top right click on ‘Shop’ button.
- From the drop down you have to choose the product you want to buy and click on it.
- In the next screen select your size, choose amount and hit on ‘Add to cart’ button.
- You have to proceed with the payment gateway.
Also Read : My HealthFirst Account Login
How MyZone Account Works:
- To know the working procedure of MyZone open the page myzone.org
- Once the page appears at the bottom click on ‘How does it work’ button.
- In the next page you have to follow these steps, Get in the zone. Effort over ability. Make it count. Gamification gains.
- You will get further explanation on the working system.
How to Subscribe for Myzone:
- To subscribe for Myzone open the website myzone.org
- After the page appears at the center provide your email
- Now click on ‘Subscribe’ button.
MyZone Contact Details:
To get more details on Myzone you can call on the toll-free number 1 (855) 769-9663.
Reference Link:
Login Guide
How to connect the Search console with your free WordPress account Without any Plugin in 2023

Google Search Console, formerly known as Google Webmaster Tools, is a free service that helps you monitor and improve your website’s performance in Google Search. It provides you with a variety of insights, including which keywords are driving traffic to your site, which pages are most popular, and any errors that Google has found while crawling your site.
Connecting your WordPress site to the Search Console is the first step to using this powerful tool to improve your website’s SEO. Here’s a step-by-step guide on how to do it:
Step 1: Create a Google Search Console account
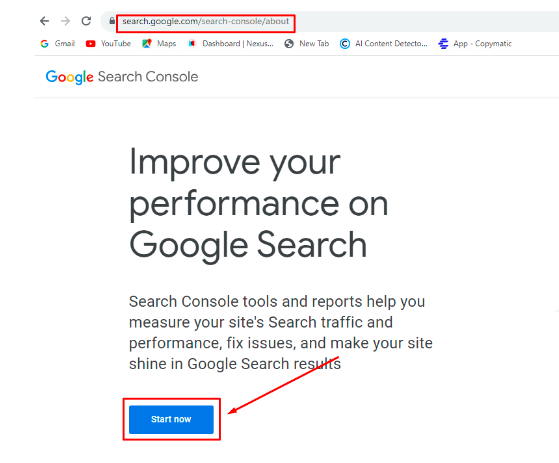
If you haven’t already, create a Google Search Console account. Visit the official Search Console website (search.google.com/search-console/) and sign in with your Google account.
Click on the ‘Start Now’ button, enter your website URL, and follow the verification steps to prove your ownership.
Step 2: Add and Verify your site ownership
To Add your site to the Google Search Console, the first thing you must do after login is Add Property. After that, Google needs to verify that you own the website. You can find two options: Domain and URL Prefix; choose what you need accordingly. For now, we use URL Prefix. Put your URL and then hit continue.
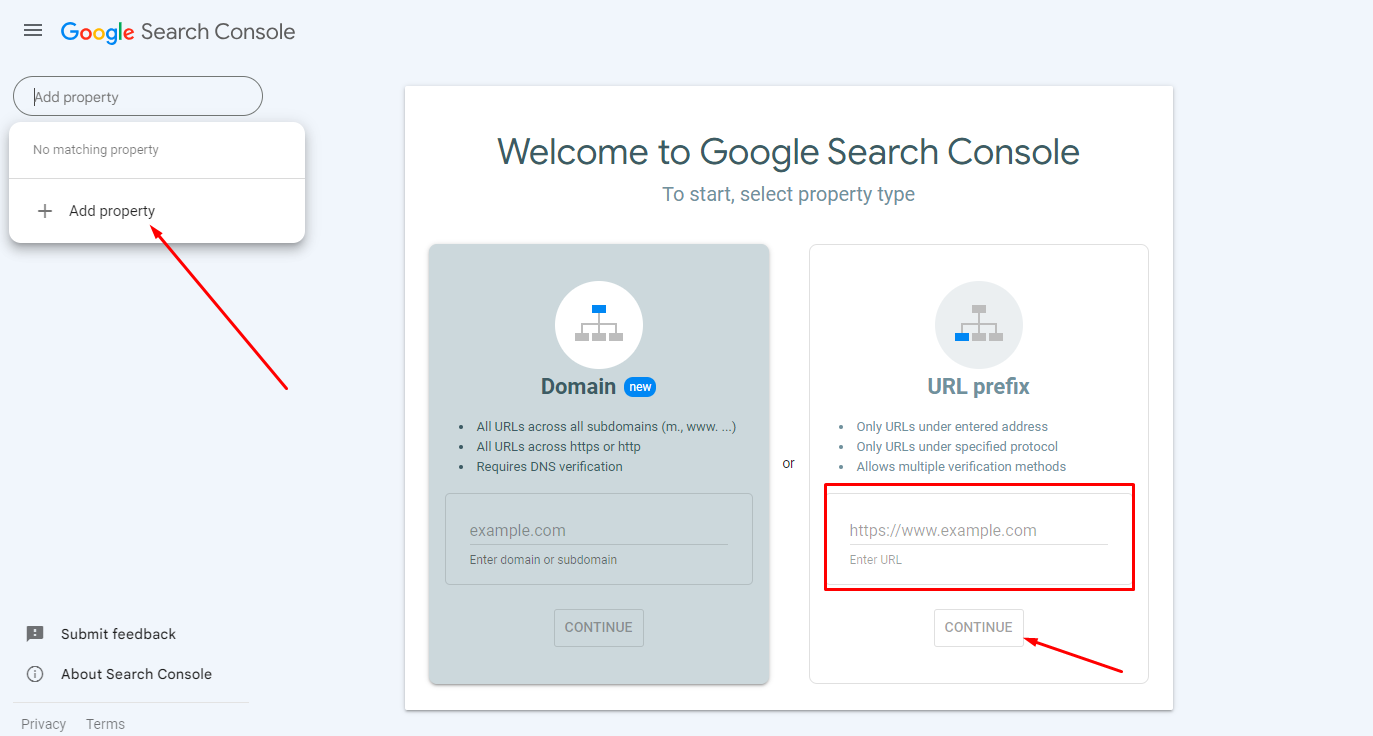
To verify we suggest using HTML verification. Copy the provided HTML verification code in the HTML tag.

Step 3: Paste the HTML verification code into your WordPress dashboard
Log in to your WordPress dashboard and go to Tools> Marketing > Traffic
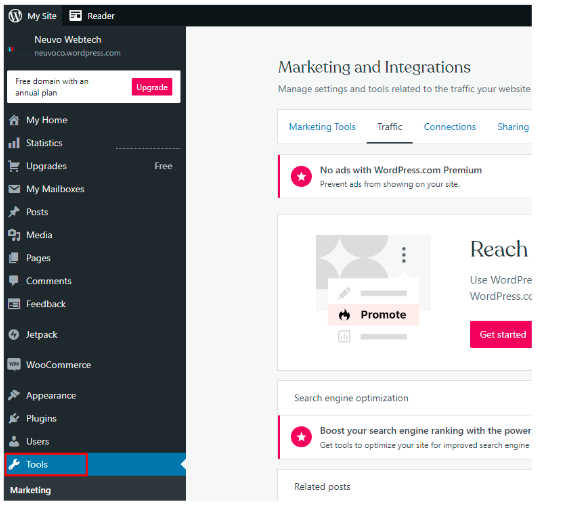

Select the Traffic option and then scroll down the page. You will find Site verification services and then paste the copied HTML verification code in the search Engine (“Google”) tab. Save the changes.

Step 4: Verify your Property in the Search Console
Return to Google Search Console and click the “Verify” button. Google will attempt to verify your site ownership. If successful, you’ll see a confirmation message.
Once your site has been added to Search Conole, you can use it to improve your website’s SEO. Here are a few things you can do:
Check your search performance
Search Console shows you which keywords are driving traffic to your site, which pages are most popular, and how your site is ranking in Google Search. You can use this information to identify which keywords you should focus on, and which pages you need to improve.
Fix crawl errors
Search Console tells you if Google has found any errors while crawling your site. These errors can prevent Google from indexing your pages correctly, so it’s important to fix them as soon as possible.
We suggest you explore all the options and focus on the recommendation by Google. You will find all guidance in the notification on your right head side. Still, if you want expert advice, contact Search Engine Optimization Company who can help you to understand and grow your business.
Create a sitemap for free WordPress.com
A sitemap is a file that lists all the pages on your website. Submitting your sitemap to Search Console helps Google crawl and index your site more efficiently.
Generally to Generate your sitemap: Use an online sitemap generator or a WordPress plugin specifically designed for generating sitemaps, but since you can’t install plugins to the free WordPress. here is the process for free WordPress.
In the WordPress dashboard go to Tools> Marketing> traffic
In the traffic option scroll down to the sitemap section. You find your sitemap.xml URL, Copy the site map URL.
Submit your sitemap to Google Search Consol
Go to Google Search Console > Sitemaps. Click “Add/Test Sitemap” and enter the URL of your previously copied sitemap. Click “Submit.”

Connecting Search Console with your free WordPress account is a simple process that can have a big impact on your website’s SEO. By following the steps above, you can start using Search Console to improve your free WordPress performance and attract more visitors. Happy Blogging!

TELUS Health is a division of TELUS, a Canadian telecommunications company, that focuses on providing digital solutions and technology for the healthcare industry. TELUS Health offers a range of products and services aimed at improving healthcare delivery, enhancing patient experiences, and enabling better communication and information management within the healthcare sector.
Here are some key aspects of TELUS Health:
- Electronic Medical Records (EMR): TELUS Health offers electronic medical records software that allows healthcare providers to digitally manage patient records, appointments, prescriptions, and other medical information. This technology aims to improve efficiency and reduce paperwork in healthcare practices.
- Healthcare Communication: TELUS Health provides communication tools that facilitate secure and efficient communication between healthcare professionals. This includes services like secure messaging and collaboration platforms.
- Virtual Care and Telehealth: TELUS Health has been involved in the development of virtual care platforms, which enable healthcare providers to offer remote consultations and medical services to patients through video calls and online communication.
- Pharmacy Management Solutions: TELUS Health offers technology solutions for pharmacies, including pharmacy management software and systems to support prescription processing, inventory management, and patient interaction.
- Personal Health Records (PHR): TELUS Health offers a personal health record platform that allows individuals to securely store and access their own health information, enabling them to take a more active role in managing their well-being.
- Healthcare Analytics and Insights: TELUS Health utilizes data analytics to provide insights to healthcare providers, policymakers, and researchers, helping them make informed decisions and improve healthcare outcomes.
- Healthcare Access Solutions: TELUS Health has been involved in initiatives to improve access to healthcare services in remote or underserved areas through the use of technology.
- Digital Health Solutions: TELUS Health is part of the broader movement towards digitizing healthcare processes and services, aiming to increase efficiency, reduce errors, and enhance patient outcomes.
Sign Up for Lifeworks Login Account
- To sign up for the account open the page www.lifeworks.com
- After the page appears on the login screen click on the ‘Sign up’ button.
- On the next screen enter the invitation code click on the ‘Continue’ button.
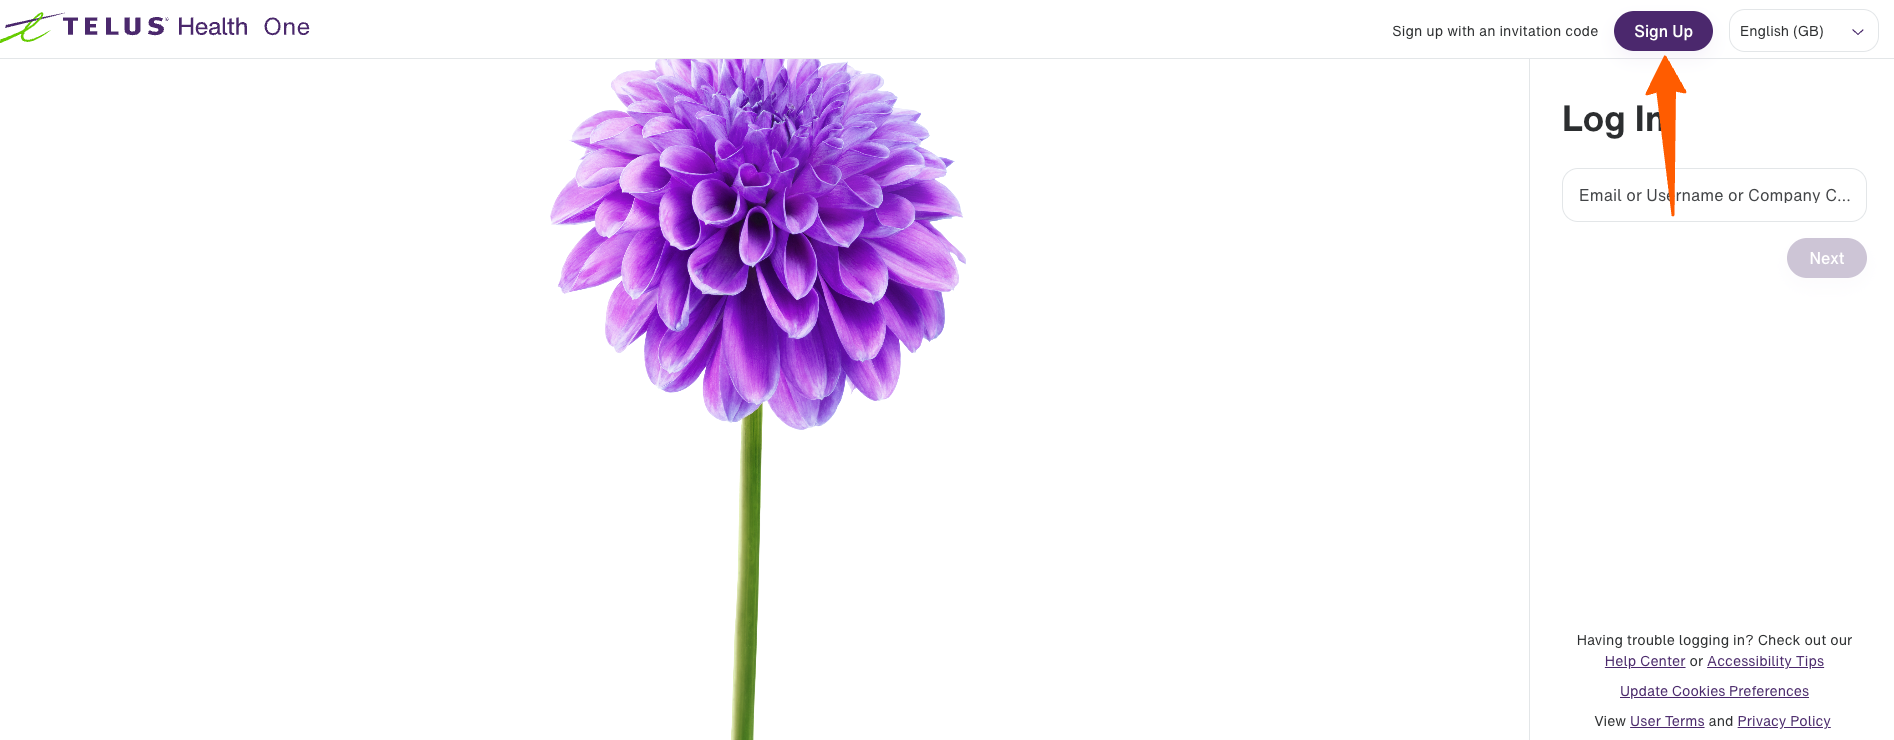
Introduction to Lifeworks Login
- For the login open the page www.lifeworks.com
- As the page opens at the top right click on the ‘Login’ button.
- In the next screen provide your email, or username, or company code.
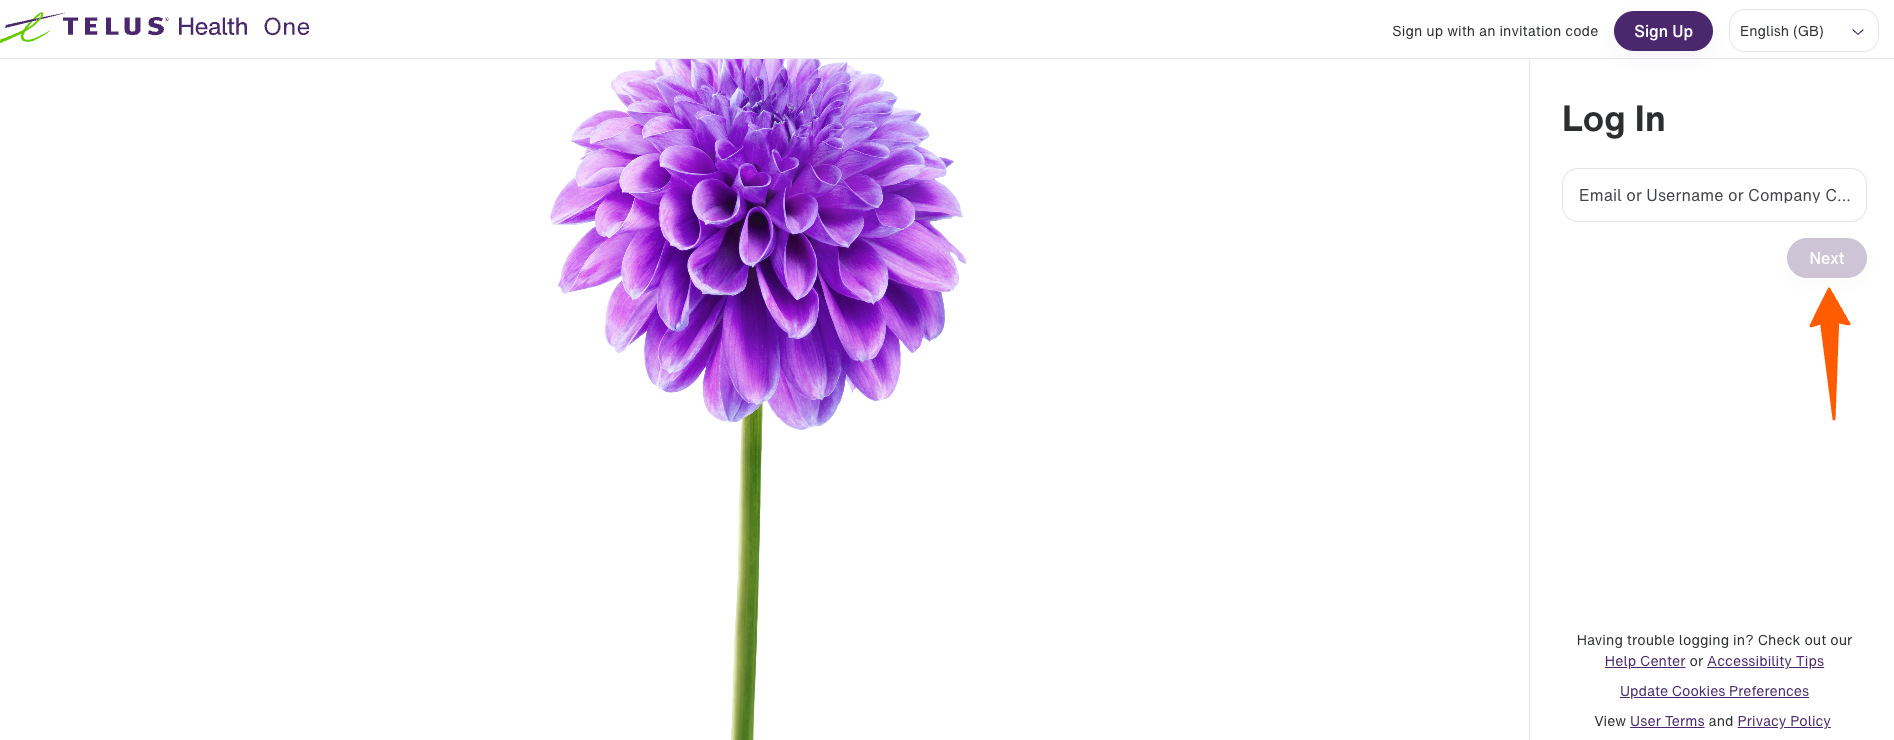
- Now click on the ‘Next’ button.
Also Read
Lifeworks Customer Information
For more information check the contact page www.lifeworks.com/contact-us.
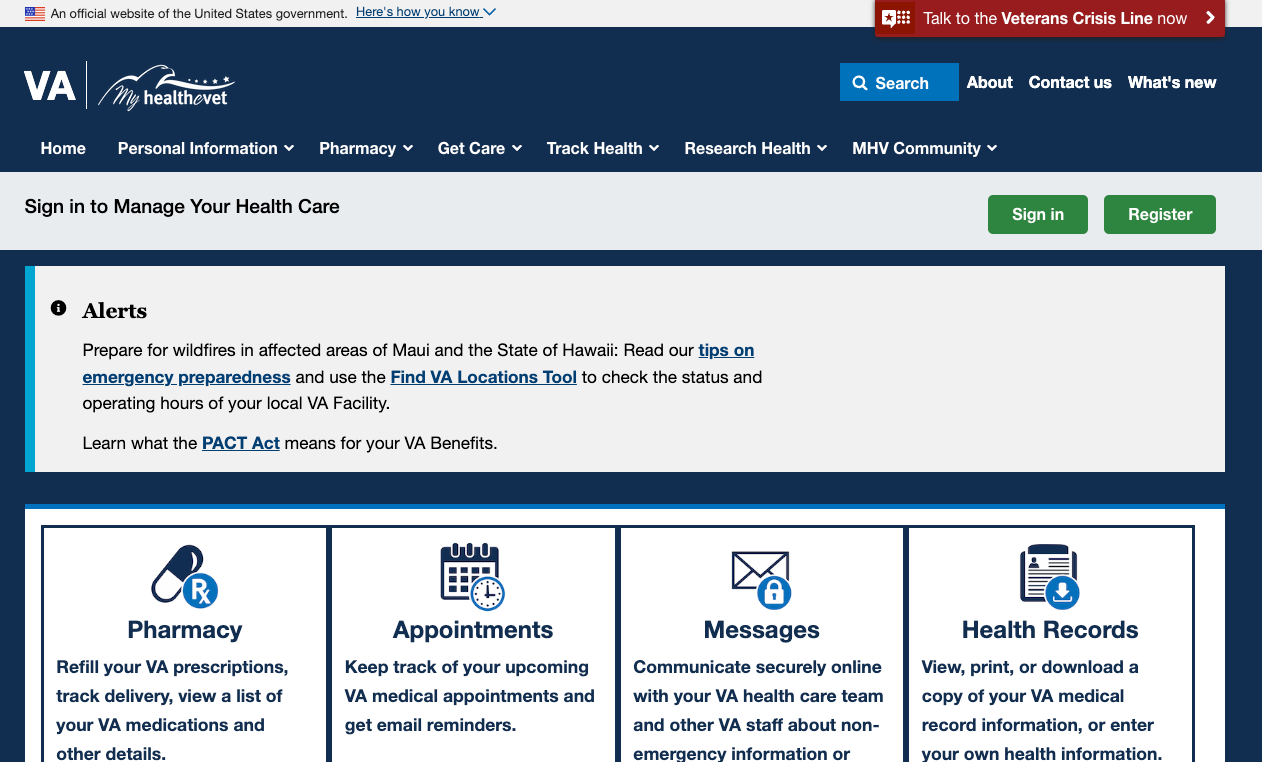
My HealtheVet is the VA’s Personal Health Record. It is intended for Veterans, Servicemembers, their guardians, and others. To utilize My HealtheVet, you will require a PC with Internet access – that is it! Getting to My HealtheVet can be at home or through the community like a library or Internet bistro. PCs may likewise be accessible to Veterans at your nearby VA Medical Center. Contact the My HealtheVet Coordinator at your nearby VA Medical Center for questions as well as assistance.
There are three different ways you can get to My HealtheVet. Each level offers an alternate method to enter the site. Select a container to study each degree of access and utilizing the apparatuses. Utilizing My HealtheVet can help you acquire a superior comprehension of your well-being status. It permits you to investigate various ways you can screen and improve your well-being.
Register for My Health Vet Login Account
- To register for the account open the pages myhealth.va.gov
- Once the login homepage appears at the top right click on the ‘Register’ button.

- In the next screen provide your relationship with VA, identification details, set notifications and reminders, contact details, choose ID and password, set security questions, accept the terms click on the ‘Create your account button.
Access your My HealtheVet Login Account
- To get exclusive benefits you need to log in to the online account first.
- To log in open the page myhealth.va.gov
- As the page appears at the top right click on the ‘Sign in’ button, or directly go to the www.myhealth.va.gov/mhv-portal-web/user-login page.
- On the next page click on ‘Continue to My HealtheVet only‘.

- For the healthiest provide the ID, and password click on the ‘Sign in’ button.
Recover My HealtheVet Login Initials
- To retrieve the login initials open the page www.myhealth.va.gov/mhv-portal-web/user-login
- After the page appears in the login homepage hit on the ‘Forgot user ID’ button.
- In the next provide name, birthdate, gender and click on ‘Next step’ button.
- For password reset provide the user ID, your name, birthdate, gender and hit on ‘Next step’ button.
Register for My Health Vet DS Account
- To register for the account open the page myhealth.va.gov
- Once the page opens at the center click on the ‘Need an account’ button.
- In the next page you have to follow the prompts.
Also Read
My Health Vet DS Login
- To login open the page myhealth.va.gov
- After the page opens at the center click of ‘DS logon’ button.
- You have to click on ‘Accept’ button. You have to enter DS Logon username and password. Now click on ‘Login’ button.
- To make an appointment and prescription refill you have to login first.
Retrieve My Health Vet DS Login Details
- To retrieve the login initials open the page myhealth.va.gov
- Once the page appears in the login homepage hit on ‘Forgot username’ button.
- In the next provide your name, birthdate, person identifier and hit on ‘Continue’ button.
- For password reset provide the required details and hit on ‘Continue’ button.
Activate My Health Vet DS Account
- To activate the account open the page myhealth.va.gov
- For the activation in the DS account click on ‘Activate my account’ button. You have to enter your name, birthdate, person identifier, activation code
- Now click on ‘Continue’ button.
Create My Health Vet ID.me Account
- To create the account open the page myhealth.va.gov
- As the page appears at the center provide your email, and password, accept the terms
- Now click on the ‘Create an ID.me account’ button.
- You can also sign up with Google, Facebook and LinkedIn.
My Health Vet ID.me Login
- For this login open the page myhealth.va.gov
- After the page appears at the center click of ‘ID.me’ button.
- You have to hit on ‘Accept’ button. You have to enter your account email, password click on the ‘Sign in to ID.me’ button.
Recover My Health Vet ID.me Login Initials
- To reset the login information open the page myhealth.va.gov
- Once the page appears in the login screen hit on ‘Forgot password’ button.
- You have to enter account email click on ‘Continue’ button.
How to Find a VA Form
- To find a form open the page va.gov/find-forms
- After the page appears at the center provide a keyword, number or form name
- You have to click on the ‘Search’ button.
My HealtheVet Contact Number
To get more help call on the toll-free number 1-877-327-0022.
-
 Login Guide3 years ago
office.com/verify – Signin to Download and Set up MS Office
-
 Internet2 years ago
www.gaia.com/activate – Actiavtion Guide for Gaia app on your Devices
-
Login Guide9 months ago
How to connect the Search console with your free WordPress account Without any Plugin in 2023
-
Login Guide11 months ago
How to Login to your Lifeworks Online Account
-
 Login Guide3 years ago
www.ups.com – Steps to Access UPS Account
-
 Finance11 months ago
How to Apply for Student Finance UK Online
-
Login Guide11 months ago
Access to your My HealtheVet Login Account
-
 Login Guide11 months ago
Steps to Access your My Care Plus Login Account